Pages

Showing posts with label 10BuScience2019. Show all posts

Tuesday, 26 November 2019

Complete Combustion

In science today we did an experiment about complete combustion. To do this we filled a plate with water (and added red food colouring), placed a candle in the water, lit the candle and put a beaker over top. The resulting reaction led to the water rising inside the beaker and once the candle was starved of oxygen and burnt out, the water stopped.

Video:

The way this works is without an outside source of oxygen, the flame uses it all and eventually runs out, thus making more space and allowing the water in.

Monday, 21 October 2019

Mt St Helens 1980

Name: Mt St Helens
Location: 154 km south of Seattle, Washington State
Year: 1980
Type of Eruption: Plinian, Pelean
Consequences: Side of the mountain was broken off

In 1980, Mt St Helens, situated just south of Seattle, Washington, erupted as a result of a 5.1 earthquake. This eruption launched a plume of ash 63000 feet in the air! It was classified as a Plinian and a Pelean eruption because not only did it explode from the top and release that massive plume of ash, it also blew a hole in the side in which lava leaked from. The created a crack from that hole to the top. The rock then slid down and broke up in a land-slide. This created a large hole in the crater.

Image result for mt st helens 1980

Friday, 27 September 2019

Wind Racers: Science

In science, we have been making wind racers. It had to go as far as possible under the power only of a leafblower. We were allowed limited resources including paper, cardboard and tape. We were also supplied a little cart that our racers would be built upon. Lots of other groups came up with regular sail designs, but Robbie (the mastermind of our group) came up with a radical design the consisted of a cardboard back and a whole lot of masking tape. It would have small strips of cardboard around the sides, a longer piece down the middle as a support, and a large piece for the back, and the rest would be covered by tape. It didn't look very good, but we thought it would work reasonably well. It had a large area for the wind to hit and propel it forward, an aerodynamic design to minimize wind resistance and light materials. Lots of people doubted us, but when we came to the actual testing of the racers, we flew. The test was to see how far they got. We chose to go sixth (for whatever reason) out of seven, so we at least got to see how well the others did before ours. Some others tried and did alright but not great. But then when someone went further then everyone's so far, so they did a victory lap. Then it was our turn. We hoped it would make their victories premature. And it did. The so far best was just over 2 metres, ours went and blew it out of the park, 3.1 metres. The last racer didn't get anywhere clos to that. We did another run after that and it went 5 metres! It's fair to say people were jealous. We then got to redesign our racers for another run. We didn't change much apart from putting a little tape edge around the outside of the back. Other groups were adopting large cardboard on the back of theirs like we had done, and so as a back-up plan if theirs somehow became better, we would put lynx spray on the wheels to grease them up and decrease friction. Others weren't happy. But the teacher said it was fair game, if they were going to take our basic design advantage, why not make a new one. We didn't end up going further, eventually going 4 metres, but it was still the best.

I had a lot of fun with this activity and hope I could do more like this in the future.

Thanks for reading my blog, please give feedback that could help my learning

Thursday, 5 September 2019

Investigating Levers

Aim: To investigate the advantage of using a lever to lift a load

Hypothesis: I think the more you move the pivot point the less load it will carry

Equipment: 30 cm ruler, a pencil, 2 plastic cups, 20 marbles, blue tak

Method: 
  1. Tape the two cups to either end of the ruler centred on the 2 cm and 28 cm mark
  2. Place the pencil under the ruler at the 15 cm mark. The pencil will act as the pivot point
  3. Add 10 marbles to the cup at the zero end of the ruler
  4. Add the marbles one by one to the other cup (at the 30 cm end) until the cups are balanced
  5. Record how many marbles were needed
  6. Move the pencil to the 13 cm mark and repeat steps 4 and 5
  7. Move the pencil to the 10 cm mark and repeat steps 4 and 5
Results/Conclusion: The more we moved the pivot point, the fewer marbles were able to be carried

Monday, 24 June 2019

Why does magnesium burn in water - Science

Magnesium. It is a metal that is used in many things that range from cars to vaccines. It is well known for being very brightly visible when burning. But another thing it can do is burn underwater. I am here to investigate how.

Experiment

Aim: To find out how Magnesium burns in water

Equipment: Magnesium Strips, Bunsen Burner, Beaker

Method:

  1. Light the Bunsen Burner
  2. Light Magnesium in the bunsen burner
  3. Once alight, drop magnesium in the water
Observations: When magnesium was on fire, it set off its signature white glow. Once dropped in the water, the magnesium lasted about 0.5 seconds before being put out. I tried many times but the same thing happened every time

Conclusion: Magnesium does burn in water sometimes, but not this time for me

I have seen some videos on this and they all worked in different ways. One was a guy spraying water on to it, another was some guy doing it similarly to mine using a beaker, however, he only held it at a high level in the water, about surface level. This allowed oxygen to get to it better and allow it to keep burning. In my experiment I just dropped it in, disallowing this to happen and ultimately it went out.

So obviously magnesium only burns in the water when held at a certain level and allowed oxygen.

I thought this until I saw another video
In the video, the person drops the magnesium in the water in a similar way to me, but it continued to burn in the water. This has perplexed me to as why mine did not work. The way magnesium can burn in water is when magnesium burns so hot that it is able to separate water molecules. Water is made up of Hydrogen and Oxygen. Hydrogen is flammable and Oxygen is basically fire, so you get the picture. 
Thanks to this random person I found on the internet

This begs the question. If magnesium burns so hot that it can literally break up water, does the temperature of the water depend on if it will work? The answer is no as the average temperature of cold tap water (the type I used) is around 7 degrees Celcius. Magnesium burns at about 2200 degrees Celcius. There is a temperature difference of 2193 degrees Celcius. That's hotter than the surface temperature of Venus, the hottest planet in the solar system.  There is a possibility that the chlorine in the water could've affected the way the experiment went. Chlorine is not flammable but I doubt that there is not enough chlorine in the water supply to stop it from happening. But for now that seems like the most likely cause, and when we stop getting chlorine in the water I'll have to try it again and see. But until then, I'll have to do other experiments.

Videos:
1.First Video
2.Second Video
3.Third Video


I had fun with this experiment and hope to get to do more in the future
Please give me feedback and let me know what to do better

Thursday, 20 June 2019

Corrosion - Science

In science, we are currently investigating corrosion and how other things can either speed up, slow down, or stall completely the corrosion process. We are currently doing an experiment where we have different iron nails and put them in different conditions. We have a nail in oil, a nail covered in nail polish in water, a nail with magnesium strips around it, in water,  a nail sitting in a mixture of water and Calcium Chloride, and a nail sitting in saltwater.

I'm not completely sure what is going to happen but here are some of my hypothesis

Nail in Saltwater: I think the nail will corrode a decent amount but not much

Nail in Oil: I don't think the nail will corrode

Nail covered in Nail polish: I don't think this nail corrode either

Nail with magnesium strips around it: I'm not sure what will happen

Nail in Calcium water: I think the nail will have been covered in gas from the reaction and not corrode

Observations:

Nail in Saltwater: The nail corroded/rusted not too much but a decent amount

Nail in Oil: The nail did not corrode at all

Nail covered in Nail Polish: The nail polish created a coating that stopped corrosion

Nail with magnesium strips: The strips rusted as well as the nail, probably had the most corrosion

Nail in Calcium water: The nail corroded slightly less than the nail in the salt water

Thank you for reading my blog, I had a lot of fun with this experiment and hope to do more like it
Please comment feedback as it helps my learning

Friday, 31 May 2019

Acid Rain

Acid Rain is a phenomenon that is the event of rain that has an unusual acidic level. This comes from pollution and is common in China, some parts of the United States of America and other places that produce pollution in mass amounts. It is a common event in those places and usually, when it happens you don't even realise.

 Image result for acid rain
Acid Rain Explained

Acid rain results when gases are sent into the atmosphere by factories and transported by wind.  These gases include SO2 and NO-x and once in the air, they react with water, oxygen and other chemicals to form sulfuric and nitric acids.  These then mix with water and other materials before falling to the ground.

The effects of Acid Rain include corrosion of stones and metals, damage to the environment and even lethality to animals. The melting of acid snow can also pollute rivers and lakes.

We can stop acid rain by shutting down factories and manufacturing plants to prevent the creation of greenhouse gases


Thursday, 16 May 2019

4 Thing I Covered in Science - Atomic Science

In science for the past few weeks, we have been doing the topic of Atomic Science. Atomic Science is the study of atoms, elements and different forms of element groups. Here are four things covered.


  • Chemical Change vs Physical change: Chemical Changes are changes that involve this such as, colour change, heat is absorbed or released and cannot be easily reversed. Changes happen every day like when you fry an egg or bake a muffin 
  • Atoms: Atoms are particles that make up everything, solids, liquids and gases. Atoms are made up of Protons, Neutrons and Electrons and the amount of these depend on which element is. Example: Hydrogen has, 1 Proton, 1 Electron and 0 Neutrons.
  • Elements: The elements are the things that make up many things in the world. They are made of atoms and each element contains a different amount of Protons, Neutrons and electrons. Example: Hydrogen has 1 Proton, 1 Electron and 0 Neutrons. However, Chlorine has 17 Protons, 17 Electrons and 18 Neutrons.
  • Atomic and Mass Numbers:  Each element on the periodic table has an atomic and mass number. The atomic number gives you the number of Protons and Electrons. The way to calculate the number of Neutrons is subtract the Atomic number from the mass number. An example is Carbon, it is sixth on the periodic table meaning its atomic number is 6. It's mass number is 12.0. 6 taken away from 12 is 6, so Carbon has 6 Protons, 6 Electrons and 6 Neutrons

Thanks for reading my blog, I had a lot of fun with this topic and I did really well on my test. Please give me feedback in the comments as it helps my learning

Friday, 12 April 2019

4 Things Covered in The Recent Topic

In the recent topic, we have been learning about Genetics and Evolution
Here are 4 of the things that we covered in this topic

1.Chromosomes: Chromosomes are made up of DNA and are received half and half from each parent. In each cell, there are 46 Chromosomes and 23 are received from each parent. They are found in the nucleus

2.Alleles: Alleles are an alternate form of genes that come in dominant and recessive forms. Dominant is marked by a Capital letter and Recessive by lower-case.

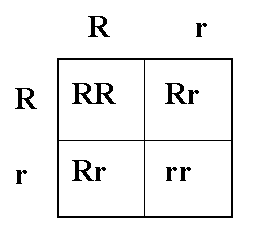
3.Punnett Squares: Punnett Squares are used to look at how people get their genes from their parents. Example:
Image result for punnett square

4. Vestigial Structures: Vestigial structures are something used by somethings ancestors that is no longer useful but is still remaining. Examples of this are the wings of a kiwi, human tail-bones and the human appendix

Thanks for reading the blog and please comment as it is helpful feedback and it is good for my learning

Tuesday, 26 February 2019

Anaerobic Respiration

Aim: To demonstrate the effects of anaerobic respiration (muscle fatigue)
Hypothesis: I think that my muscles will take a while to fatigue
Equipment: A spring-loaded clothes peg
Method:

  1. Hold the clothes peg as shown in the diagram below
  2. Relax your fingers so that the peg closes all the way
  3. Squeeze your thumb and forefinger so the peg is fully open
  4. Repeat steps 2 and 3 as quickly as you can until you experience muscle fatigue
Results: The more that I moved the peg, the more my muscles started to feel pain. My muscles were exercised more the longer I did it.  In relation to my hypothesis, I was wrong.
Conclusion: I saw that peg was slowing down because my muscles got tired
Evaluation: I would try to go for longer and see how much more it hurts